VMware Workstation 产品允许用户将 Linux、Windows 等多个操作系统作为虚拟机在单台 PC 上运行。用户可以在虚拟机上重现服务器、桌面和平板电脑环境,无需重新启动即可跨不同操作系统同时运行应用。Workstation 还提供隔离的安全环境,用于评估新的操作系统(如 Windows 10)、测试软件应用和补丁程序以及参考体系结构。
Linux是一套免费使用和自由传播的操作系统内核,是一个基于POSIX和Unix的多用户、多任务、支持多线程和多CPU的操作系统内核。它能运行主要的Unix工具软件、应用程序和网络协议。它支持32位和64位硬件。Linux继承了Unix以网络为核心的设计思想,是一个性能稳定的多用户网络操作系统内核。文章源自合一学院-https://unvmax.com/vmware%e8%99%9a%e6%8b%9f%e6%9c%ba%e5%ae%89%e8%a3%85linux-centos-8%e7%b3%bb%e7%bb%9f%e6%95%99%e7%a8%8b.html
Linux学习教程:Linux操作系统学习笔记整理文章源自合一学院-https://unvmax.com/vmware%e8%99%9a%e6%8b%9f%e6%9c%ba%e5%ae%89%e8%a3%85linux-centos-8%e7%b3%bb%e7%bb%9f%e6%95%99%e7%a8%8b.html
今天来试一下在VMware Workstation Pro下安装Linux(CentOS-8),供大家参考。文章源自合一学院-https://unvmax.com/vmware%e8%99%9a%e6%8b%9f%e6%9c%ba%e5%ae%89%e8%a3%85linux-centos-8%e7%b3%bb%e7%bb%9f%e6%95%99%e7%a8%8b.html
一、安装VMware workstation 15
网上有很多VMware Workstation Pro的安装教程,可以参考一下。文章源自合一学院-https://unvmax.com/vmware%e8%99%9a%e6%8b%9f%e6%9c%ba%e5%ae%89%e8%a3%85linux-centos-8%e7%b3%bb%e7%bb%9f%e6%95%99%e7%a8%8b.html
参考教程:VMware Workstation Pro v15 中文安装教程文章源自合一学院-https://unvmax.com/vmware%e8%99%9a%e6%8b%9f%e6%9c%ba%e5%ae%89%e8%a3%85linux-centos-8%e7%b3%bb%e7%bb%9f%e6%95%99%e7%a8%8b.html
如果软件密钥激活可以在百度上面搜一下激活密钥,菜单栏【帮助】-【输入许可证密钥E】-然后输入密钥就行。文章源自合一学院-https://unvmax.com/vmware%e8%99%9a%e6%8b%9f%e6%9c%ba%e5%ae%89%e8%a3%85linux-centos-8%e7%b3%bb%e7%bb%9f%e6%95%99%e7%a8%8b.html

二、下载CentOS 8安装镜像
去官方网站下载文章源自合一学院-https://unvmax.com/vmware%e8%99%9a%e6%8b%9f%e6%9c%ba%e5%ae%89%e8%a3%85linux-centos-8%e7%b3%bb%e7%bb%9f%e6%95%99%e7%a8%8b.html
https://www.centos.org/download/
三、在VMware Workstation Pro下安装CentOS 8
1.点击【创建新的虚拟机】

2.选择【典型】 点击【下一步】

3.选择【稍后安装操作系统】 下一步

4.选择【Linux】和【CentOS 7 64位】 下一步
这里面没有CentOS 8,我们先选择CentOS 7 64位,到后面改下名就好了。文章源自合一学院-https://unvmax.com/vmware%e8%99%9a%e6%8b%9f%e6%9c%ba%e5%ae%89%e8%a3%85linux-centos-8%e7%b3%bb%e7%bb%9f%e6%95%99%e7%a8%8b.html

5.设置虚拟机名称和虚拟机文件存放位置

6.设置虚拟机磁盘大小和虚拟机文件存储方式

7.选择虚拟机的配置
点击【自定义配置】

选择内存大小 一般2G足够

选择处理器配置

选择ISO镜像文件,就是下载的CentOS-8安装镜像文件

其他配置保持默认 然后点击【关闭】

点击【配置完成】

8.开启虚拟机 开始安装系统

如图 选择【Install CentOS Linux 8】,按【Enter】

等待检查配置

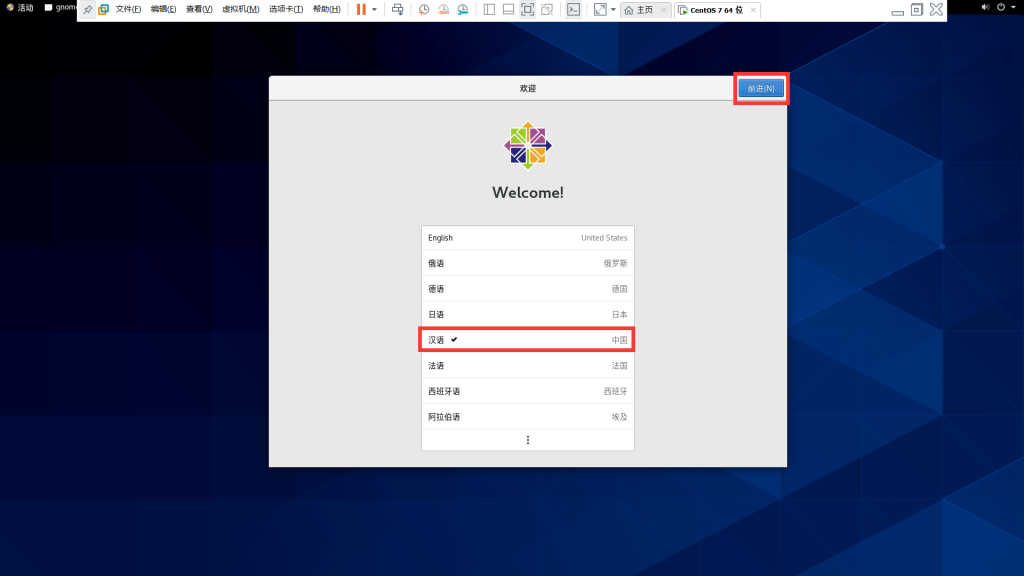
选择语言

选择时区


选择系统安装位置


点击【开始安装】

设置管理员root账户密码


然后等待安装完成,点击【重启】

四、初始化设置
1.接受许可


2.创建一个普通账户


完成后点击【结束配置】文章源自合一学院-https://unvmax.com/vmware%e8%99%9a%e6%8b%9f%e6%9c%ba%e5%ae%89%e8%a3%85linux-centos-8%e7%b3%bb%e7%bb%9f%e6%95%99%e7%a8%8b.html

3.用普通账户登录系统 看图操作


五、 CentOS网络设置
1.让CentOS连上网络

2.查看CentOS-8的内网登录IP
打开终端文章源自合一学院-https://unvmax.com/vmware%e8%99%9a%e6%8b%9f%e6%9c%ba%e5%ae%89%e8%a3%85linux-centos-8%e7%b3%bb%e7%bb%9f%e6%95%99%e7%a8%8b.html

输入
ifconfig
找到了CentOS-8的内网登录IP

六、用shell工具登录
1.安装Finalshell工具
点击下载Finalshell 下载完成后直接安装就好
2.打开Finalshell 添加Shell链接


链接成功

七、其他补充
为了不每次登录都要去点一下如图所示的位置,我们可以做一些配置。
执行命令:
vim /etc/sysconfig/network-scripts/ifcfg-ens33

总结
整个安装过程操作下来还是比较繁琐的,其实使用VPS,拥有一个远程的Linux是个不错的选择。