Emby是市面上为数不多的私人多媒体服务器软件,它有最强大的影片搜刮能力(没有之一),并且可以非常便捷远程维护其媒体库。作为一个完美的媒体播放解决方案,它提供了包括但不限于:播放、转码、刮削媒体信息、管理资料库、电视直播等功能。使用体验非常舒适,并且提供全平台客户端和web端支持。
VPS挂载Google Drive无限空间网盘——存放电影文章源自合一学院-https://unvmax.com/%e4%bd%bf%e7%94%a8emby%e6%90%ad%e5%bb%ba%e8%87%aa%e5%b7%b1%e7%9a%84%e5%aa%92%e4%bd%93%e4%b8%ad%e5%bf%83-vps%e6%8c%82%e8%bd%bdgoogle-drive.html
Emby——影音系统 搜刮电影信息&播放电影文章源自合一学院-https://unvmax.com/%e4%bd%bf%e7%94%a8emby%e6%90%ad%e5%bb%ba%e8%87%aa%e5%b7%b1%e7%9a%84%e5%aa%92%e4%bd%93%e4%b8%ad%e5%bf%83-vps%e6%8c%82%e8%bd%bdgoogle-drive.html
准备工作
1.一台VPS服务器
参考教程1:Bandwagon HOST搬瓦工VPS服务器购买和登录教程文章源自合一学院-https://unvmax.com/%e4%bd%bf%e7%94%a8emby%e6%90%ad%e5%bb%ba%e8%87%aa%e5%b7%b1%e7%9a%84%e5%aa%92%e4%bd%93%e4%b8%ad%e5%bf%83-vps%e6%8c%82%e8%bd%bdgoogle-drive.html
参考教程2:Vultr VPS最新注册充值购买和SSH远程登录教程文章源自合一学院-https://unvmax.com/%e4%bd%bf%e7%94%a8emby%e6%90%ad%e5%bb%ba%e8%87%aa%e5%b7%b1%e7%9a%84%e5%aa%92%e4%bd%93%e4%b8%ad%e5%bf%83-vps%e6%8c%82%e8%bd%bdgoogle-drive.html
2.加入电影共享团队盘
如果自己去整理电影资源非常耗时耗力,网上有人专门整理的,推荐这个:文章源自合一学院-https://unvmax.com/%e4%bd%bf%e7%94%a8emby%e6%90%ad%e5%bb%ba%e8%87%aa%e5%b7%b1%e7%9a%84%e5%aa%92%e4%bd%93%e4%b8%ad%e5%bf%83-vps%e6%8c%82%e8%bd%bdgoogle-drive.html
购买商品 – 嘎鱼饭Emby服务专营店——专业服务每一位影视爱好者文章源自合一学院-https://unvmax.com/%e4%bd%bf%e7%94%a8emby%e6%90%ad%e5%bb%ba%e8%87%aa%e5%b7%b1%e7%9a%84%e5%aa%92%e4%bd%93%e4%b8%ad%e5%bf%83-vps%e6%8c%82%e8%bd%bdgoogle-drive.html

一、VPS挂载Google Drive网盘
1.安装rclone挂载工具
curl https://rclone.org/install.sh | sudo bash
2.配置rclone
rclone config
name emby 随意取 但是后面的代码也会相应改变文章源自合一学院-https://unvmax.com/%e4%bd%bf%e7%94%a8emby%e6%90%ad%e5%bb%ba%e8%87%aa%e5%b7%b1%e7%9a%84%e5%aa%92%e4%bd%93%e4%b8%ad%e5%bf%83-vps%e6%8c%82%e8%bd%bdgoogle-drive.html

Choose a number from below, or type in your own value
选谷歌 (13) 可能会因为版本的不同而改变 注意选择 Google drive文章源自合一学院-https://unvmax.com/%e4%bd%bf%e7%94%a8emby%e6%90%ad%e5%bb%ba%e8%87%aa%e5%b7%b1%e7%9a%84%e5%aa%92%e4%bd%93%e4%b8%ad%e5%bf%83-vps%e6%8c%82%e8%bd%bdgoogle-drive.html

client_id> 直接回车文章源自合一学院-https://unvmax.com/%e4%bd%bf%e7%94%a8emby%e6%90%ad%e5%bb%ba%e8%87%aa%e5%b7%b1%e7%9a%84%e5%aa%92%e4%bd%93%e4%b8%ad%e5%bf%83-vps%e6%8c%82%e8%bd%bdgoogle-drive.html

client_secret> 直接回车文章源自合一学院-https://unvmax.com/%e4%bd%bf%e7%94%a8emby%e6%90%ad%e5%bb%ba%e8%87%aa%e5%b7%b1%e7%9a%84%e5%aa%92%e4%bd%93%e4%b8%ad%e5%bf%83-vps%e6%8c%82%e8%bd%bdgoogle-drive.html

Choose a number from below, or type in your own value
scope> 1 选1 有最大的使用权限

root_folder_id>直接回车
service_account_file>直接回车

Edit advanced config? (y/n)
y) Yes
n) No (default)
y/n> n #不用别的高级配置

Use auto config?
- Say Y if not sure
- Say N if you are working on a remote or headless machine
y) Yes (default)
n) No
y/n> n #不用自动配置

Please go to the following link: https://xxxxxxxxxxxxxxxxxxxxxxxxxxxxxx
Log in and authorize rclone for access

登录谷歌账号授权


Enter verification code>贴入你获取到的key

Configure this as a team drive?
y) Yes
n) No (default)
y/n> y

Choose a number from below, or type in your own value
1 / 共享硬盘 \ “XXXXXXXXXXXXXXXXXXX”
2 / 精英挂载NO1_HL02 \ “XXXXXXXXXXX”
3 / SYNC_115网盘 \ “XXXXXXXXXXXXXXX”

y) Yes this is OK (default)
e) Edit this remote
d) Delete this remote
y/e/d> y

e) Edit existing remote
n) New remote
d) Delete remote
r) Rename remote
c) Copy remote
s) Set configuration password
q) Quit config
e/n/d/r/c/s/q> q

3.挂载Google Drive到VPS目录
创建一个挂载目录,我们在/home/目录下创建gdrive文件夹作为挂载目录。
mkdir -p /home/gdrive
挂载Google Drive
/usr/bin/rclone mount emby: /home/gdrive \ --umask 0000 \ --default-permissions \ --allow-non-empty \ --allow-other \ --buffer-size 32M \ --dir-cache-time 12h \ --vfs-read-chunk-size 64M \ --vfs-read-chunk-size-limit 1G &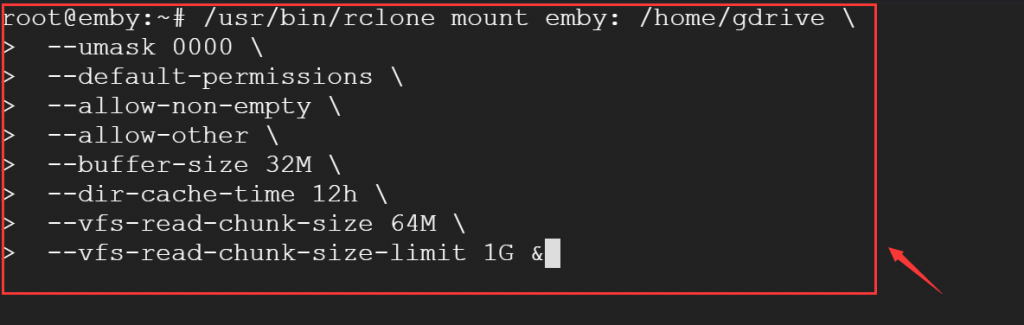
上面这些可以根据需要自己改参数,如果VPS配置高可以吧数字改大一点。
如果出现如下提示:

运行图下命令之后从新挂载:
CentOS系统
yum install fuse -ydebian/Ubuntu系统
apt-get install fuse 4.查看挂载是否成功
df -h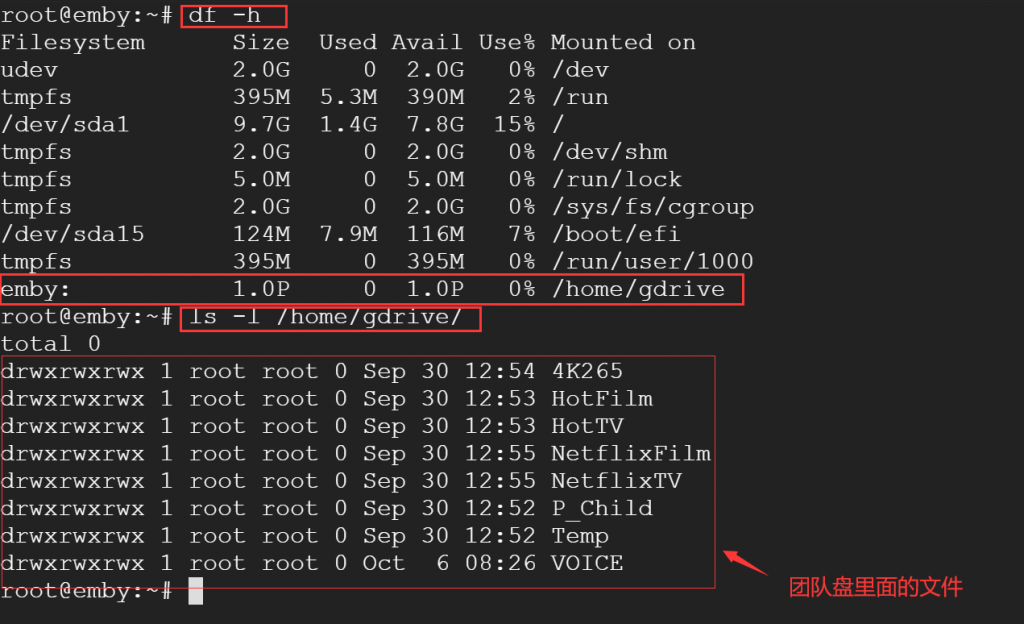
5、设置开机自动挂载
VPS终端运行如下命令就可以了
cat > /etc/systemd/system/rclone.service <<EOF[Unit]Description=RcloneAssertPathIsDirectory=LocalFolderAfter=network-online.target[Service]Type=simpleExecStart=/usr/bin/rclone mount emby: /home/gdrive \ --umask 0000 \ --default-permissions \ --allow-non-empty \ --allow-other \ --buffer-size 32M \ --dir-cache-time 12h \ --vfs-read-chunk-size 64M \ --vfs-read-chunk-size-limit 1GExecStop=/bin/fusermount -u LocalFolderRestart=on-abortUser=root[Install]WantedBy=default.targetEOF运行完上面的代码就可以用如下的命令进行控制了。
systemctl start rclone #启动systemctl stop rclone #停止systemctl enable rclone #允许开机自动启动二、安装Emby
1.Emby简介
官网:Emby – The open media solution

Emby是市面上为数不多的私人多媒体服务器软件,它有最强大的影片搜刮能力(没有之一),并且可以非常便捷远程维护其媒体库。作为一个完美的媒体播放解决方案,它提供了包括但不限于:播放、转码、刮削媒体信息、管理资料库、电视直播等功能。使用体验非常舒适,并且提供全平台客户端和web端支持。
2.Emby搭建方法
进入官网后,点击【Download】–【Linux】

我使用的是Debian X64系统,安装方法如下(其他Linux系统同理):

具体方法如下
2.1安装wget下载工具&下载Emby安装包
apt-get install wget && wget https://github.com/MediaBrowser/Emby.Releases/releases/download/4.5.2.0/emby-server-deb_4.5.2.0_amd64.deb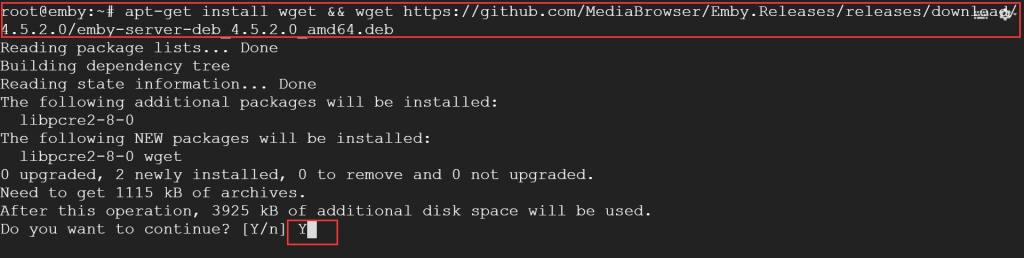
2.2安装Emby
dpkg -i emby-server-deb_4.5.2.0_amd64.deb
如果没有报错,安装就完成了。
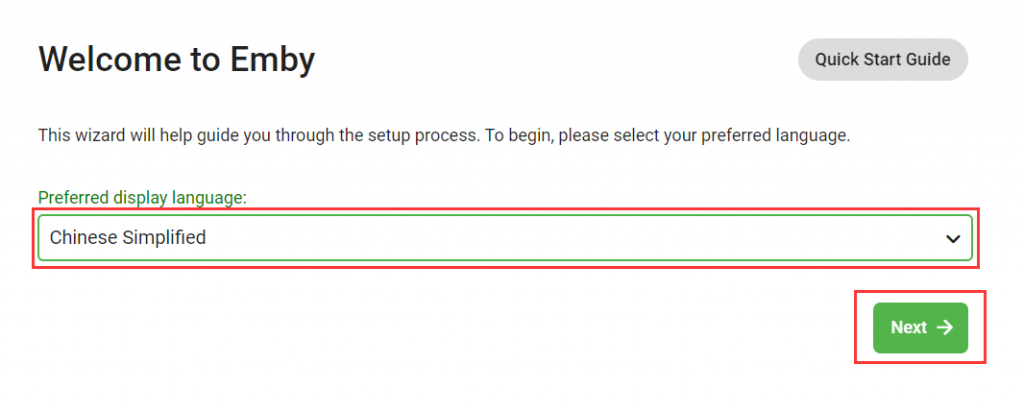
三、Emby初始化设置
浏览器打开,配置看图操作。
http://VPS的IP地址:8096
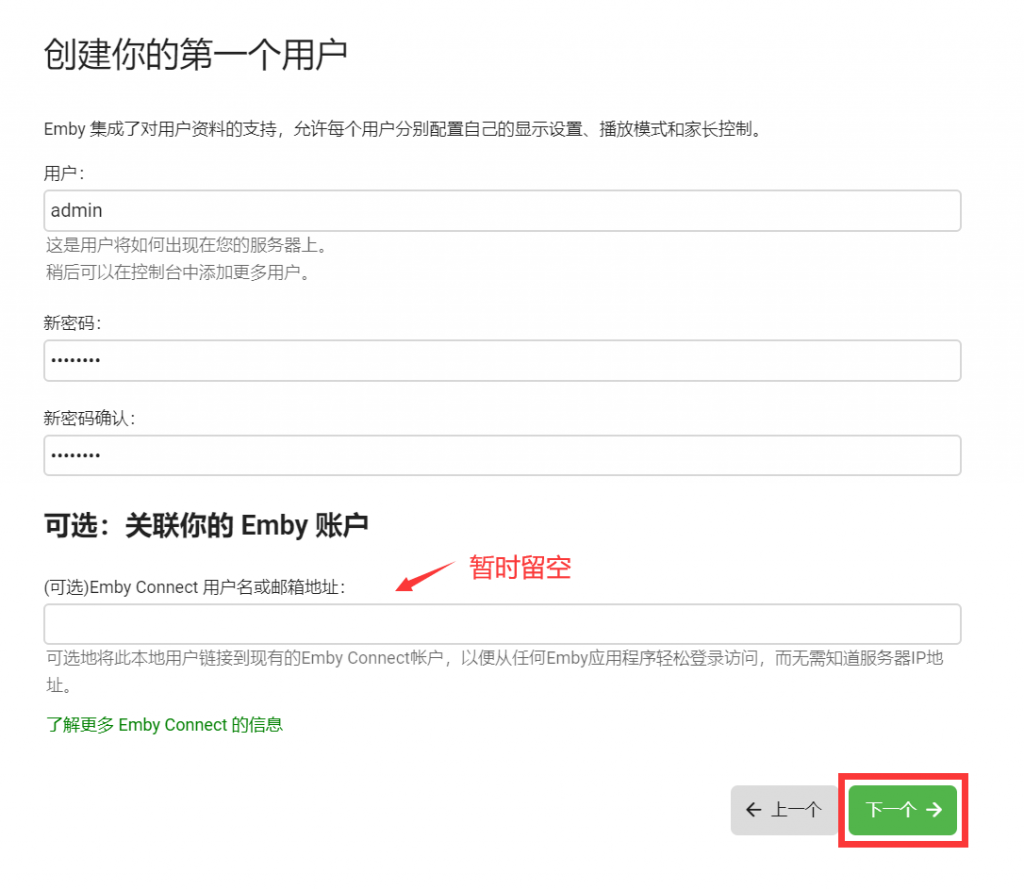
这里暂时不添加媒体库


四、Emby添加媒体库
进入Emby后,我们发现里面什么都没有,是因为我们没有添加媒体库。我们点击右侧的【设置】开始添加媒体库。

点击左侧的【媒体库】,参照下命的图片设置。


到这里Emby的一个媒体库就添加完成了,我们可以用同样的方法添加其他的媒体库。
添加完成媒体库需要等待Emby检索数据,等一下就行了。
五、效果展示
效果如图:

Emby、不限于于如此,还可以播放音乐、电视直播等功能。感兴趣可以自己研究一下。