
内网访问群晖也要加端口,觉得麻烦,将5000端口修改为80;5001端口修改为443,实现面端口访问。
参考原文地址:群晖修改默认5000、5001端口为80、443(更新系统有风险,紧急修复)-CSDN博客文章源自合一学院-https://unvmax.com/%e7%be%a4%e6%99%96nas%e4%bf%ae%e6%94%b9%e9%bb%98%e8%ae%a45000%e3%80%815001%e7%ab%af%e5%8f%a3%e4%b8%ba80%e3%80%81443.html
一、 释放80、443端口占用
#ssh登陆nas
sudo -i #切换至root用户
#检查端口占用情况
netstat -anp |grep 80
netstat -anp |grep 443
#能确定端口被nginx占用

cd /usr/syno/share/nginx
#文件备份
cp server.mustache server.mustache_`date +%Y%m%d`
cp DSM.mustache DSM.mustache_`date +%Y%m%d`
cp WWWService.mustache WWWService.mustache_`date +%Y%m%d`

#其中的8080、8443自行调整
sed -i "s/80/8080/g" server.mustache
sed -i "s/80/8080/g" DSM.mustache
sed -i "s/80/8080/g" WWWService.mustache

sed -i "s/443/8443/g" server.mustache
sed -i "s/443/8443/g" DSM.mustache
sed -i "s/443/8443/g" WWWService.mustache

#重启nginx
/usr/bin/nginx -s stop
#等待两分钟nginx会自行启动,检查nginx服务
ps -ef|grep nginx

#检查端口占用情况
netstat -anp |grep 80
netstat -anp |grep 443
二、修改默认端口
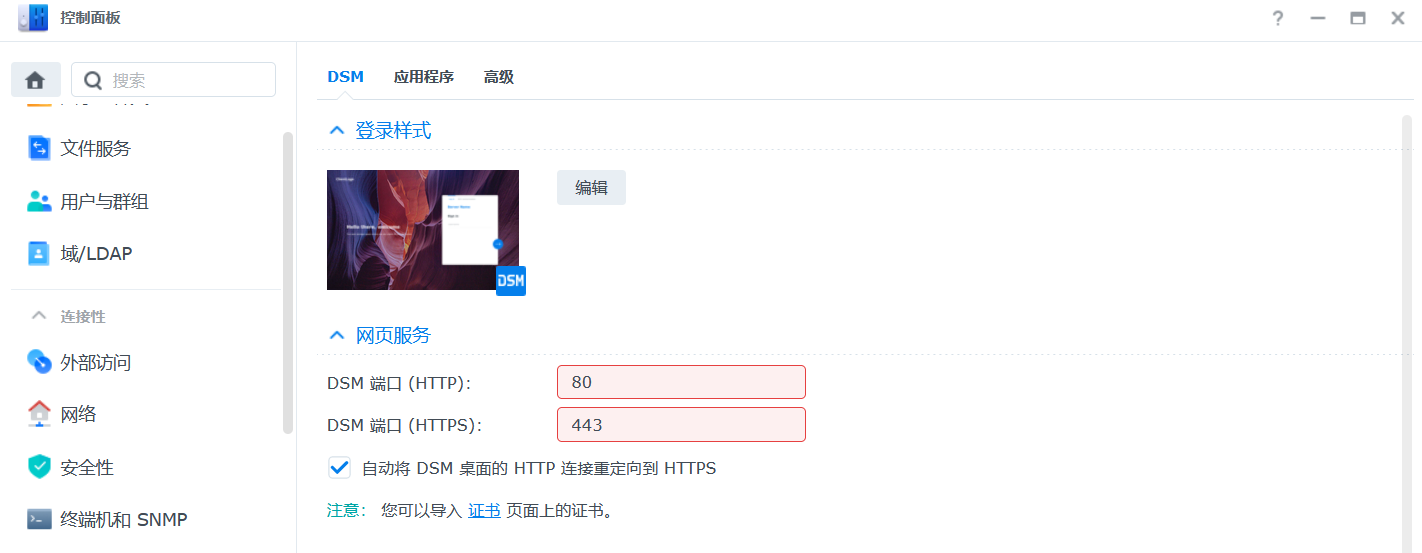
回到DSM页面 “控制面板” - “登陆门户” - “DSM” - “网页服务”,DSM的http和https依旧无法调整,可以通过更改配置文件更改。文章源自合一学院-https://unvmax.com/%e7%be%a4%e6%99%96nas%e4%bf%ae%e6%94%b9%e9%bb%98%e8%ae%a45000%e3%80%815001%e7%ab%af%e5%8f%a3%e4%b8%ba80%e3%80%81443.html
#ssh登陆nas
sudo -i #切换至root用户

cd /usr/syno/etc/www
#文件备份
cp DSM.json DSM.json_`date +%Y%m%d`

### ---以下内容调整的是DSM等登陆页端口---
### ---如需调整反向代理的端口,请修改ReverseProxy.json文件---

#sed调整或者vi修改
sed -i "s/5000/80/g" DSM.json
sed -i "s/5001/443/g" DSM.json

#重启nginx
/usr/bin/nginx -s stop
#等待两分钟nginx会自行启动,检查nginx服务
ps -ef|grep nginx
三、登陆DSM页面验证
端口已调整,注意登陆的地址。例: https://192.168.1.8 不用在后面跟端口号,美中不足的是DSM页面 “控制面板” - “登陆门户” - “DSM” - “网页服务”,打开默认红框框,无法手动调整该页面的其他内容。文章源自合一学院-https://unvmax.com/%e7%be%a4%e6%99%96nas%e4%bf%ae%e6%94%b9%e9%bb%98%e8%ae%a45000%e3%80%815001%e7%ab%af%e5%8f%a3%e4%b8%ba80%e3%80%81443.html
文章源自合一学院-https://unvmax.com/%e7%be%a4%e6%99%96nas%e4%bf%ae%e6%94%b9%e9%bb%98%e8%ae%a45000%e3%80%815001%e7%ab%af%e5%8f%a3%e4%b8%ba80%e3%80%81443.html
 文章源自合一学院-https://unvmax.com/%e7%be%a4%e6%99%96nas%e4%bf%ae%e6%94%b9%e9%bb%98%e8%ae%a45000%e3%80%815001%e7%ab%af%e5%8f%a3%e4%b8%ba80%e3%80%81443.html
文章源自合一学院-https://unvmax.com/%e7%be%a4%e6%99%96nas%e4%bf%ae%e6%94%b9%e9%bb%98%e8%ae%a45000%e3%80%815001%e7%ab%af%e5%8f%a3%e4%b8%ba80%e3%80%81443.html
文章源自合一学院-https://unvmax.com/%e7%be%a4%e6%99%96nas%e4%bf%ae%e6%94%b9%e9%bb%98%e8%ae%a45000%e3%80%815001%e7%ab%af%e5%8f%a3%e4%b8%ba80%e3%80%81443.html
文章源自合一学院-https://unvmax.com/%e7%be%a4%e6%99%96nas%e4%bf%ae%e6%94%b9%e9%bb%98%e8%ae%a45000%e3%80%815001%e7%ab%af%e5%8f%a3%e4%b8%ba80%e3%80%81443.html
四、自挖坑填补操作
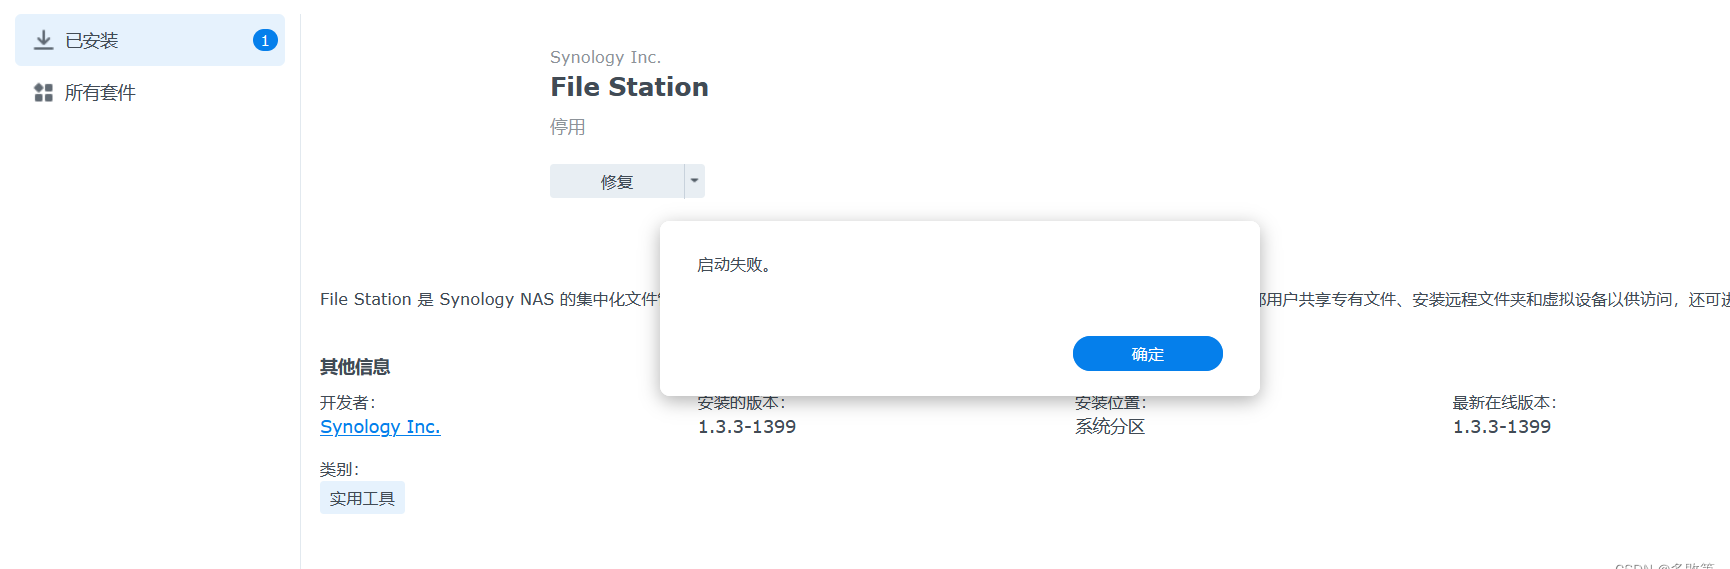
今天DSM更新了7.1,结果发现File Station无法修复,所有其他的程序都无法安装。文章源自合一学院-https://unvmax.com/%e7%be%a4%e6%99%96nas%e4%bf%ae%e6%94%b9%e9%bb%98%e8%ae%a45000%e3%80%815001%e7%ab%af%e5%8f%a3%e4%b8%ba80%e3%80%81443.html
 文章源自合一学院-https://unvmax.com/%e7%be%a4%e6%99%96nas%e4%bf%ae%e6%94%b9%e9%bb%98%e8%ae%a45000%e3%80%815001%e7%ab%af%e5%8f%a3%e4%b8%ba80%e3%80%81443.html
ssh连上服务器检查报错日志
vi /var/log/synoscgi.log
#或
journalctl -xe
#可以查到相关的报错信息
排查发现还是nginx端口导致,手动修改端口。
cd /usr/syno/etc/www
cp DSM.json DSM.json_`date +%Y%m%d`
sed -i "s/80/5000/g" DSM.json
sed -i "s/443/5001/g" DSM.json

ps -ef|grep nginx
#停止nginx 稍后nginx会自动重启
ps aux | grep nginx | grep -v grep | awk '{print $2}' | xargs kill -9
完结。